| 일 | 월 | 화 | 수 | 목 | 금 | 토 |
|---|---|---|---|---|---|---|
| 1 | 2 | 3 | 4 | |||
| 5 | 6 | 7 | 8 | 9 | 10 | 11 |
| 12 | 13 | 14 | 15 | 16 | 17 | 18 |
| 19 | 20 | 21 | 22 | 23 | 24 | 25 |
| 26 | 27 | 28 | 29 | 30 | 31 |
- 도쿄
- 둠
- ARM
- 태블릿 리눅스
- 갤럭시 핏2
- 박물관
- cross compile
- 한강
- 아마추어무선
- 캠핑
- Termux
- ubuntu 24.04
- 스마트폰 리눅스
- 페루
- iGPSPORT
- 여행
- 일본
- BSC100S
- FT-8
- 한강 라이딩코스
- 저렴한 속도계
- 제주도
- 가족여행
- 어린이
- 딸래미
- 대만
- 크로스 컴파일
- 체험학습
- 비욘드트러스트
- 휴양림
- Today
- Total
주희아빠의 헝그리 라이딩
ARM - Cross Compile 기초와 OpenSSH 실전 포팅 본문
2023.11.14
1. Cross Compile 기초
'이기종에서 둠 돌리기' 프로젝트를 진행하면서 크로스 컴파일을 공부하고 있을 무렵 마침 실제로 크로스 컴파일을 해야할 일이 하나 생겼습니다. arm 리눅스 기반 시스템인데 open ssh 서버가 없는 녀석을 발견했습니다. 마침 공부도 하고 실제로 써 먹을 수도 있는 좋은 기회가 생겼군요.
처음엔 '그냥 컴파일러 잘 구해서 돌리면 되는거 아니야?' 라고 생각하고 시작했는데 역시나 크나큰 오산입니다.
인터넷에 있는 수많은 문서들을 보고 따라해도 잘 되지 않았습니다. 심지어 크로스 컴파일러 종류나 이름이 살짝 살짝 달라서 내가 오타를 내고 있는건지 아니면 예제들이 잘못된 것인지를 구분할 수가 없습니다. 나중에는 성공을 해도 이게 제대로 한건지 헛갈리기 시작합니다.
그렇게 해서 정리된 대략의 크로스 컴파일러 종류는 다음과 같습니다.
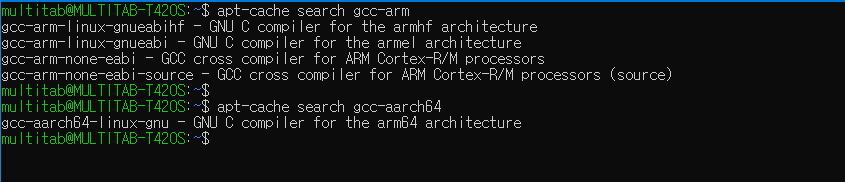
multitab@MULTITAB-T420S:~$ apt-cache search gcc-arm
gcc-arm-linux-gnueabihf - GNU C compiler for the armhf architecture
gcc-arm-linux-gnueabi - GNU C compiler for the armel architecture
gcc-arm-none-eabi - GCC cross compiler for ARM Cortex-R/M processors
gcc-arm-none-eabi-source - GCC cross compiler for ARM Cortex-R/M processors (source)
multitab@MULTITAB-T420S:~$
multitab@MULTITAB-T420S:~$ apt-cache search gcc-aarch64
gcc-aarch64-linux-gnu - GNU C compiler for the arm64 architecture
multitab@MULTITAB-T420S:~$
가장 기본으로 gcc-arm-linux-gnueabi 과 gcc-aarch64-linux-gnu 이 있습니다. 앞의 것은 32bit 이고 뒤에 것은 64bit 입니다.
제 경우는 타겟 시스템이 32bit 운영체제여서 64bit 로 컴파일한 것은 동작을 안하더군요. 32bit 로 다시 진행 함.
이어서 gcc-arm-linux-gnueabihf 이 있는데 32bit 용과 같은 이름에 hf 가 붙은 것입니다. 대상 시스템에 부동 소수점 계산 장치가 있으면 하드웨어 가속이 가능하다고 합니다. (287, 387 코프로세스 알면 아재 인증이려나요.)
그리고 가장 헛갈리는 gcc-arm-none-eabi 입니다. 설명에는 '운영 체제를 완전히 사용하지 않으려는 베어 메탈 프로그래밍용' 이라고 하는데 아마도 리눅스와 관련된 코드를 연결하지 않는 모양입니다.
* 참고 용어
EABI (Embedded ABI) - (Embedded Application Binary Interface)
: ARM이나 PPC(PowerPC)같은 임베디드 시스템에 적합하도록 개정된 ABI 표준을 말한다
Ubuntu 에서는 다음 커맨드를 통해 쉽게 설치할 수 있습니다. 각기 다른 패키지이기 때문에 중복으로 설치할 수도 있고 필요에 따라 소스를 받아 컴파일해서 사용할 수도 있습니다.
다음 4개를 구분하고 해당 명령어가 어떤 것인지를 구분하는 것만으로도 커다란 벽을 넘은 것입니다. 나중에라도 유용하다고 느끼신 분이 계신다면 블로그에 댓글이라도 하나 달아 주십시오. 굽신...
--각 버전의 설치 패키지 이름과
$ sudo apt install gcc-arm-linux-gnueabi
$ sudo apt install gcc-arm-linux-gnueabihf
$ sudo apt install gcc-aarch64-linux-gnu
$ sudo apt install gcc-arm-none-eabi


-- 각 컴파일러 실행파일 이름
$ arm-linux-gnueabi-gcc -v
$ arm-linux-gnueabihf-gcc -v
$ aarch64-linux-gnu-gcc -v
$ arm-none-eabi-gcc -v
-- 시작전. 다음의 명령을 통해 아키텍처와 32/64bit 를 알 수 있습니다.
-- x86 은 최근에는 거의 64bit 일테고 arm 의 경우는 arm, aarch64 등으로 구분됩니다.
$ uname -m
x86_64
$ arch
x86_64
$ getconf LONG_BIT
64그럼 시험삼아 크로스 컴파일을 진행해 봅니다. 소스는 우선 가장 기본인 Hello World 변형입니다. (사실 이 이상 코딩 능력이 없습니다.)
$ cat hello.c#include <stdio.h>
int main() {
printf("Hello, Multitab!!");
return 0;
}-- x86 기본 컴파일
$ gcc -o hello_origin hello.c
-- arm 32bit 컴파일
$ arm-linux-gnueabi-gcc -o hello_arm_32 hello.c
--arm 64bit 컴파일
$ aarch64-linux-gnu-gcc -o hello_arm_64 hello.c
-- file 명령으로 실행파일의 내용 확인
$ file hello_*
hello_arm_32: ELF 32-bit LSB executable, ARM, EABI5 version 1 (SYSV), dynamically linked, interpreter /lib/ld-linux.so.3, BuildID[sha1]=66e0cca2cc22dbe23fd2545f504f90e66573cbef, for GNU/Linux 3.2.0, not stripped
hello_arm_64: ELF 64-bit LSB pie executable, ARM aarch64, version 1 (SYSV), dynamically linked, interpreter /lib/ld-linux-aarch64.so.1, BuildID[sha1]=8b989f1c560e45cc7db5adb2694e847a016dbbec, for GNU/Linux 3.7.0, not stripped
hello_origin: ELF 64-bit LSB pie executable, x86-64, version 1 (SYSV), dynamically linked, interpreter /lib64/ld-linux-x86-64.so.2, BuildID[sha1]=e1776376b5ec24c4d7218e2285538b2f6c813481, for GNU/Linux 3.2.0, not stripped
-- x86 은 잘 실행됨
$ ./hello_origin
Hello, Multitab!!
-- arm 은 실행안됨. arm 시스템으로 복사해서 실행하면 잘 될 듯?
$ ./hello_arm_32
-bash: ./hello_arm_32: cannot execute binary file: Exec format error
2. Open SSH ARM 크로스 컴파일

다음 블로그에서 많은 도움 받았습니다. 사실 거의 그대로 따라했습니다. 다시 한번 감사
https://m.blog.naver.com/love_tolty/221498150221
OpenSSH 크로스컴파일(Cross-Compile)하여 ARM 보드에 설치 및 동작 테스트하기
0. 들어가기 전에.... | 간단한 포스팅 소개 우리가 흔히 원격지 호스트로 접속을 위해 ...
blog.naver.com
open ssh 에서 필요로 하는 zlib 와 openssl 을 차례로 준비해 줍니다. 물론 이 라이브러리 역시 크로스 컴파일되어야 사용할 수 있습니다.
제가 필요한 타겟이 32bit 여서 먼저 작업했는데 나중에 재현할 때는 64bit 용으로 다시 진행하였습니다. 두가지 정보 모두 기록해 놓았습니다.
zlib 의 경로는 컴파일되는 위치를 기억하기 때문에 /etc/ 에 위치 시킵니다.
-- 나중에 타겟 시스템에서 실행할 때 절대패스로 재료를 기억하기 때문에 / 로 올려서 작업해야 한다!
$ sudo mkdir -p /etc/compile_zlib
$ sudo chmod -R 777 /etc/compile_zlib

$ wget https://www.zlib.net/zlib-1.3.tar.xz
$ tar xvf zlib-1.3.tar.xz
$ cd zlib-1.3/

$ CC=aarch64-linux-gnu-gcc prefix=/etc/compile_zlib ./configure

$ make
$ make install


-- arm 64bit 확인
$ file /etc/compile_zlib/lib/*
..중략..
/etc/compile_zlib/lib/libz.so.1.3: ELF 64-bit LSB shared object, ARM aarch64, version 1 (SYSV), dynamically linked, BuildID[sha1]=872401cf6fd63e35dcda0b92c69f6f24ce9e570d, not stripped


--참고. 32bit용
$ CC=arm-linux-gnueabi-gcc prefix=/etc/compile_zlib ./configure

-- arm 32bit 확인
$ file /etc/compile_zlib/lib/*
..중략..
/etc/compile_zlib/lib/libz.so.1.3: ELF 32-bit LSB shared object, ARM, EABI5 version 1 (SYSV), dynamically linked, BuildID[sha1]=22447b180194f56e352143e765cfb43e5239778c, not stripped
openssl 은 비교적 최신인 1.1.1w 로 진행하였습니다. 설치 디렉토리는 /usr/local/ 쪽으로 바꿀 수 있지만 그렇게 되면 기존 파일과 충돌하거나 패키징 할 때 헛갈릴 수 있어 구분을 위해 그냥 로컬 경로를 이용하였습니다. 익숙해지면 나중에 바꾸는 것도 고려해 볼만 합니다.
--https://www.openssl.org/
--$ wget https://www.openssl.org/source/old/1.0.2/openssl-1.0.2u.tar.gz
$ wget https://www.openssl.org/source/openssl-1.1.1w.tar.gz
$ tar xvf openssl-1.1.1w.tar.gz

$ cd openssl-1.1.1w
$ ./Configure linux-generic32 -static --prefix=$HOME/etc/compile_openssl --cross-compile-prefix=aarch64-linux-gnu-

-- 컴파일 옵션 뒤에 aarch64-linux-gnu- '-' 까지 있는 것에 주의.
-- cpu 성능에 따라 몇분 걸리네요.
$ make
$ make install


-- arm 용 64bit
$ file ~/etc/compile_openssl/bin/*
/home/multitab/etc/compile_openssl/bin/openssl:  ELF 64-bit LSB executable, ARM aarch64, version 1 (GNU/Linux), statically linked, BuildID[sha1]=2782eed08a338fda50d256345c785a30729f4376, for GNU/Linux 3.7.0, not stripped


--참고 32bit 용
./Configure linux-generic32 -static --prefix=$HOME/etc/compile_openssl --cross-compile-prefix=arm-linux-gnueabi-

-- arm 용 32bit
$ file ~/etc/compile_openssl/bin/*
/home/multitab/etc/compile_openssl/bin/openssl:  ELF 32-bit LSB executable, ARM, EABI5 version 1 (SYSV), statically linked, BuildID[sha1]=cf752eea64c4d8ff590d6a61b1510b42b712bf0d, for GNU/Linux 3.2.0, not stripped
openssh 본체입니다. 최신인 9.5p1 은 진행중 에러가 나서 Ubuntu 20.04 에서 사용하는 8.9p1 으로 진행하였습니다.
-- 크로스 컴파일을 지원하는 configure 의 경우 다음처럼 --help 옵션을 주면 사용할 수 있는 옵션이 나오며
-- build 와 host 모두 타겟 시스템을 기준으로 적어줍니다.
-
$ ./configure --help

System types:
  --build=BUILD     configure for building on BUILD [guessed]
  --host=HOST       cross-compile to build programs to run on HOST [BUILD]
--https://www.openssh.com/portable.html
--$ wget https://ftp.jaist.ac.jp/pub/OpenBSD/OpenSSH/portable/openssh-7.9p1.tar.gz
--$ wget https://ftp.jaist.ac.jp/pub/OpenBSD/OpenSSH/portable/openssh-9.5p1.tar.gz <- 컴파일 실패
$ wget https://ftp.jaist.ac.jp/pub/OpenBSD/OpenSSH/portable/openssh-8.9p1.tar.gz
$ tar xvf openssh-8.9p1.tar.gz
$ cd openssh-8.9p1

$ ./configure --target=aarch64-linux-gnu --host=aarch64-linux-gnu --prefix=$HOME/etc/compile_openssh --with-zlib=/etc/compile_zlib --with-ssl-dir=$HOME/etc/compile_openssl --disable-strip

$ make
--$ make install
$ sudo make install-nokeys

--./ssh-keygen: Exec format error 방지용.
-- sudo 로 하는 이유는 아래 에러 방지 및 나중에 패키징할 넘이 어차피 root 라서. 아래 디렉토리도 꼭 챙겨가야 합니다. 아니면 그냥 만들어도.
--/usr/bin/mkdir: cannot create directory ‘/var/empty’: Permission denied

-- 생성된 파일 확인
~/etc/compile_openssh/bin$ file *
scp:         ELF 64-bit LSB pie executable, ARM aarch64, version 1 (SYSV), dynamically linked, interpreter /lib/ld-linux-aarch64.so.1, BuildID[sha1]=812bb87dad8ec628c7a998f74847f26c84eb0aaa, for GNU/Linux 3.7.0, with debug_info, not stripped
sftp:        ELF 64-bit LSB pie executable, ARM aarch64, version 1 (SYSV), dynamically linked, interpreter /lib/ld-linux-aarch64.so.1, BuildID[sha1]=96e3d875672f04d0344633ea887f735e3125e41d, for GNU/Linux 3.7.0, with debug_info, not stripped
ssh:         ELF 64-bit LSB pie executable, ARM aarch64, version 1 (SYSV), dynamically linked, interpreter /lib/ld-linux-aarch64.so.1, BuildID[sha1]=a551dd86199477aeda72fe9b0aeb641af86ba551, for GNU/Linux 3.7.0, with debug_info, not stripped
ssh-add:     ELF 64-bit LSB pie executable, ARM aarch64, version 1 (SYSV), dynamically linked, interpreter /lib/ld-linux-aarch64.so.1, BuildID[sha1]=da66acdfc11cc77f992d9b57e817dfdaf196ca9d, for GNU/Linux 3.7.0, with debug_info, not stripped
ssh-agent:   ELF 64-bit LSB pie executable, ARM aarch64, version 1 (SYSV), dynamically linked, interpreter /lib/ld-linux-aarch64.so.1, BuildID[sha1]=fe74ab99203f2b3c5e63742dda3f4f212ec1456f, for GNU/Linux 3.7.0, with debug_info, not stripped
ssh-keygen:  ELF 64-bit LSB pie executable, ARM aarch64, version 1 (SYSV), dynamically linked, interpreter /lib/ld-linux-aarch64.so.1, BuildID[sha1]=4914329bb5c3e5643e89539a6515ff72306bf979, for GNU/Linux 3.7.0, with debug_info, not stripped
ssh-keyscan: ELF 64-bit LSB pie executable, ARM aarch64, version 1 (SYSV), dynamically linked, interpreter /lib/ld-linux-aarch64.so.1, BuildID[sha1]=ac052b0237b5404edb92b57db9ec05187b83b80c, for GNU/Linux 3.7.0, with debug_info, not stripped

-- 32bit 용 설정
$ ./configure --host=arm-linux-gnueabi --target=arm-linux-gnueabi --prefix=$HOME/etc/compile_openssh --with-zlib=/etc/compile_zlib --with-ssl-dir=$HOME/etc/compile_openssl --disable-strip
-- 잘 묶어서 가져갑니다.
$ sudo tar cvfz openssh-8.9p1.tar.gz /home/multitab/etc/compile_openssh/
-- target 시스템으로 이동후 압축해제
$ sudo tar xvf openssh-8.9p1.tar.gz
-- 설치되는 서버에서 최초 한번 실행 필요
$ sudo /home/multitab/etc/compile_openssh/bin/ssh-keygen -q -t rsa -f /home/multitab/etc/compile_openssh/etc/ssh_host_rsa_key -C '' -N ''
$ sudo /home/multitab/etc/compile_openssh/bin/ssh-keygen -q -t ecdsa -f /home/multitab/etc/compile_openssh/etc/ssh_host_ecdsa_key -C '' -N ''
$ sudo /home/multitab/etc/compile_openssh/bin/ssh-keygen -q -t ed25519 -f /home/multitab/etc/compile_openssh/etc/ssh_host_ed25519_key -C '' -N ''
-- 생성된 키 확인
$ ls -al /home/multitab/etc/compile_openssh/etc/
--실행
$ sudo /home/multitab/etc/compile_openssh/sbin/sshd
-- Missing privilege separation directory: /var/empty 에러 처리용
$ sudo mkdir /var/empty
$ sudo chown root:sys /var/empty
$ sudo chmod 755 /var/empty마지막 설치 부분은 지금 시스템에서 다시 풀어서 실행하지는 않고 기록을 적은 것이라서 압축이 풀리는 디렉토리 모양 등이 다를 수 있습니다. 이 부분은 적당히 다듬어서 사용하면 됩니다.
필요에 따라 start/stop 을 포함하는 시동 스크립트도 담고 tar.gz 이나 rpm 등으로 잘 패키징해서 사용하면 됩니다. openssh 를 직접 컴파일하실 분은 별로 없겠지만 유용하게 이용하시기 바랍니다.
3. 보너스 정보
위의 크로스 컴파일된 Hello 예제를 arm 으로 옮겼을 때 정말 잘 동작할까요? 64bit 용 ubuntu 20.04 가 설치된 '라즈베리파이 3B' 로 이동해서 실행시켜 봅시다.
pi@raspberrypi:~/tmp$ ./hello_arm_32
-bash: ./hello_arm_32: No such file or directory

pi@raspberrypi:~/tmp$ ./hello_arm_64
./hello_arm_64: /lib/aarch64-linux-gnu/libc.so.6: version `GLIBC_2.34' not found (required by ./hello_arm_64)

-- arm 64bit 입니다.
$ arch
aarch64
32bit 의 경우 64bit 에서도 돌아야 하는거 아닌가 싶은데 안도는군요.(32bit 라이브러리 추가후 시도 예정)
64bit 의 경우 동작에 필요한 glibc 2.34 를 찾는군요. 컴파일한 곳의 ubuntu 22.04 로 glibc 가 2.35 군요. 한끝 차이인데 좀 안봐주나...
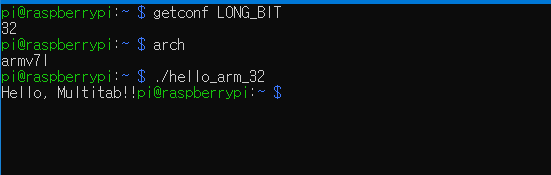
라즈비안 Bullseye(11) - 32bit 버전을 올려서 시험해 봅니다. 그러나 결과는 역시나 실패. 얘도 glibc 2.34 를 찾는군요. 라즈비안 bullseye 는 2.31 정도로 보입니다.
-- armv7l 32bit Raspbian GNU/Linux 11 (bullseye) 버전
pi@raspberrypi:~ $ ./hello_origin
-bash: ./hello_origin: cannot execute binary file: Exec format error

pi@raspberrypi:~ $ ./hello_arm_32
./hello_arm_32: /lib/arm-linux-gnueabihf/libc.so.6: version `GLIBC_2.34' not found (required by ./hello_arm_32)

pi@raspberrypi:~ $ ./hello_arm_64
-bash: ./hello_arm_64: cannot execute binary file: Exec format error
운이 좋은 경우라면 한번에 잘 동작했을 수도 있습니다만 결국 타겟 시스템의 정확한 정보를 알고 있어야 작전을 잘 세울 수 있습니다. 위에서 컴파일한 openssh 역시 glibc 버전 등이 달랐다면 실행이 안됐을 수도 있습니다. 다행히 제가 필요로 하는 타겟 시스템에서는 잘 동작하였습니다.
이러한 것은 해결 방법이 없을까요? 조만간 등장할 buildroot 와 docker 에게 한번 기대해 봅시다. 둠 하나 돌리려다가 도대체 어디까지 확장이 되려는지...
추가. ubuntu 20.04 에서 다시 크로스 컴파일해서 보낸 녀석은 32bit 에서 잘 동작합니다.